|
the art of soldering
by Martin Field
I have made models for nearly 50 years, as
much because I could never afford to buy when I was younger as because kit
makers didn't do what I wanted. Once you successfully make something from
raw materials, it's very difficult to go back to lifting the lid, though I
still get a buzz from doing that on the rare occasion it happens.
One of the skills most often asked about is soldering. Now I know nothing
of resistance soldering, so I'll stick to "conventional" techniques.
These are flame and iron. If you are soldering thin sheet and wire and
smaller fittings, an iron is sufficient, BUT...it has its drawbacks, chief
of which is that it must be ON the workpiece to work. This can mean
dislodging finer parts and especially, leaving behind excess solder which
has to be cleaned up. Having said that, I still use an iron, because it's
sometimes just easier to turn on the plug and have a quick cuppa till it's
hot.
In which case...
Clean the tip of the iron on wet and dry sandpaper or with a file so the
copper shines. Put some flux on it and some solder, all pretty quick,
including that thin wedged edge of the tip. Shake off excess or wipe with
something that won't burn your fingers. I'm a shaker, a disrespecter of
carpets!
You just need a nice thin coating of "tin" on
the tip so it looks silver and doesn't burn. Now, having assessed where
you need your joint to be, you need to tin the edges. It goes without
saying that the material you're soldering should be VERY clean. Flux it
sparingly, but continuously along the joint's length and the other surface
similarly, melt some solder onto the tip and run it along the joint line.
Don't try doing it all at once or you'll have too much solder on the tip
which will transfer too much to the work. Do it in more than one stage if
necessary. Having got a thin line of solder on each edge of your joint
assemble the two pieces and run the iron along the joint, watching for the
solder to melt into and between itself. Don't leave the iron too long in
any one place. Let's aim at, say, a 1/4" a second on a linear run. I'm
assuming we're doing an etched kit here. Something like a tank to
footplate joint. If you're happy with it having actually joined and not
being wobbly,
leave it. There WILL be excess solder to clean up, but that's fine. If
there are lumps, try smoothing them with the iron quickly, but don't
linger anywhere.
Now you'll have to clean up the excess and the best way to do it is with
little chisels you make yourself from broken Swiss files. If you don't
have a bench grinder use a little grinding wheel in your mini drill. The
pink things that come with even the cheapest drill kit from Lidl's. Just
hold the broken file (preferably a three square) against the wheel lightly
and keep quenching the chisel in a cup of water. Don't let it get red hot
or it'll lose it's temper. Frankly I'd be livid, myself, too!
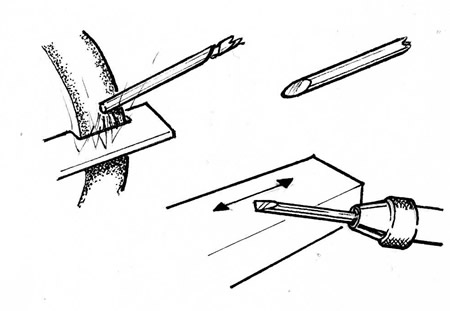
Keep it sharp with a small stone. Very slightly round off the corners so
it doesn't dig in to the material's surface, but cleaves through the
solder with ease. Keep it sharp, too. It'll save you a lot of time
spending a few seconds honing the edge. If you've never been so course as
to break a Swiss file in your life, use a broken drill, it'll just need a
bit more grinding. If you've never broken a small drill, you're either to
mild or a fibber.
And there is your first solder joint. So let's discuss materials, etc.
The iron can be a 65Watt for general work or a 25W for smaller stuff, but
don't ask big joints of a 25Watt. Buy the best you can afford,. but that
goes for all tools.
The solder is these days likely to be a lead
free type with a little silver in it. This is NOT silver solder, more of
that anon. Buy the kind of 1.5mm diameter stuff you can get for a quid in
Poundland or be posh and buy the genuine article 5 cored stuff that radio
hams use. If you can get the very thin wire type do so. I got mine from a
Sunday bootsale. There are different temperature solders, which allegedly
make near joints more easily attainable. I'm sure they do, but I'm too
tight to stock up like that and I've become a bit good at getting in and
out quick!
Flux. Don't go for that old brown waxy
stuff, Fluxite. There are new fluxes which work well and they look like
lard (ask Granny). They come in a little round black or yellow pot and are
usually called things like Superflux, etc. I got my last one in B&Q's so
don't go paying through the nose from specialists unless you absolutely
have too. Now these fluxes all have a corrosive nature. They wouldn't be
any good if they didn't , so once you've finished a "session", get indoors
and scrub the
model with Jif, or Ajax or whatever they call those abrasive powders these
days. Use warm water and a tooth brush and get in everywhere or 20 years
down the line your precious will fall apart, but with such realistic rusty
joints! A good going over with Ajax'll also make your nickel and brass
look sweet.
Apart from all the above make sure you have a stand for the soldering
iron. If it comes with a hook on the handle, find somewhere safe to hook
it. If not use one of those springy things that you push the tip end into,
but in both instances, do make sure that the weight or stiffness of the
cable can't pull it out or off its stand. It might not be a candescent
heat, but it will melt things till they catch fire. I've stupidly had it
happen.
Having got used to soldering with an electric
iron, we should look at soldering with a flame. Soft soldering, that is. I
used to have a Calor hand torch with removable burners for different jobs.
I probably still have somewhere, but it's hiding so I bought a cheap
cartridge powered one and it has proved to be perfectly adequate. If you
are willing to buy a proper torch kit which uses a separate gas cylinder,
I would always recommend it. They are quieter and less prone to running
out of gas. Being able to screw on a tiny flamed burner is their best
facility, but they are expensive. I've seen them at Boot Sales for about
£12, so that would be ideal IF they have a regulator in good condition,
because they are expensive items on their own.
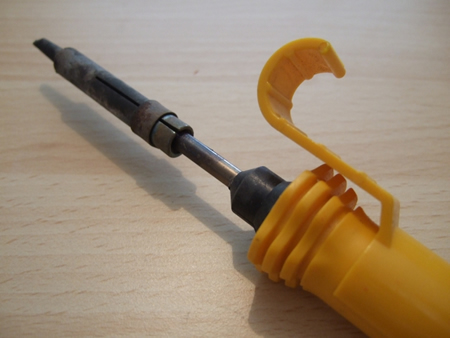
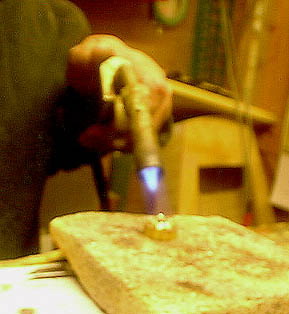
However you arrange it, you need a medium
burner/flame size.(See photo) . There two ways of doing this, dependant,
really on the job in hand. For the joint we spoke of in the soldering
iron section, it might be best to tin with the iron first, then flame the
joint, but if your material is spotlessly clean you should be able to make
a joint without tinning. Flux the joint area, both surfaces, and then lay
either fine wire solder along the joint or small pieces of larger diameter
solder, clipped off with a knife at close intervals along the joint.
For all flame soldering you will have make
arrangements for holding the work remotely, as you just can't risk injury
where flames are concerned. You need a soldering hearth of some kind. I
used heat reflective block for years until it got into such a state of
decrepitude with old flux, etc. that it had to go. My current favourite
is the backing block from a SuperSer heater, which can be gained for a few
pounds at local auctions. I got mine from a repairer of such things who
normally just throws them out when he changes them for new. However, for
soft soldering only, you can use a fly-ash block or a bit of one from a
building site, etc. As long as there is enough space to keep the work
flat and level and enough space also for any supports for the pieces. the
beauty of SuperSer blocks is that they are covered in tiny holes into
which you can push soft iron wire supports, (see photo). Ideally, buy a
proper jewellers' block from someone like Walsh or Shesto.
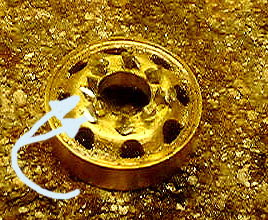
flame soldering nuts on the wheel of a model car
The wire pieces have been clipped off the
stick and put
into the holes. Then they must be loaded round with a little flux and
finally tiny chips of solder cut off the end of the solder wire with a
knife and put next to each piece of wire.(arrowed)
It remains only to make the joint. Now,
obviously if you attack some thin sheet with hundreds of degrees of heat
in one go, you'll have a warped, burnt object. What you must do is gently
introduce the heat to the work, by bringing the torch closer and always,
ALWAYS keep it moving to and fro. The hottest part of a torch flame is
just forward of the tip of the blue cone. We might need that for hard
(silver) soldering, but we need nowhere near it for soft.
About an inch forward of it, assuming a nice
medium flame, is hot enough. Keep it moving always, use the flux action as
a guide. You are looking for a steady melting of the flux into the joint
area along with a shrivelling of the solder pieces into little balls. Just
a little more heat (NO closer, please) and the solder should flash into
the joint. That's what happened on the little truck wheel in the photo.
As soon as that happens, remove the heat. If it doesn't happen, don't keep
the heat there. Remove the flame and look into why it hasn't flashed.
Maybe there was too little flux and it burned or you were too bold with
the heat. This might be the best way to get neat joints, but it isn't the
easiest and will need some practice. But for some kinds of joints needing
more heat than an iron will happily provide, it's the only method.
The beauty of flame heated soft solder joints
is that they need almost no cleaning up, but if they do, it's the same as
the iron soldered joints.

|