|
Glenthorne Harbour buildings
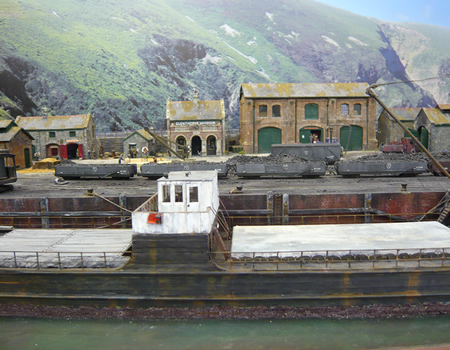
the end result
From the very start, I had always intended to
scratch build the structures at the harbour. This is a lot of what I do
for a living these days! However, time is not always on one's side and I
would like to get the harbour looking reasonable for my autumn
exhibitions.
Many, many years ago, I was persuaded into
doing a bit of Colorado HNO3 modelling. I built a cast plaster model of
Como roundhouse from an extremely expensive kit, and very fine it was too.
I had never seen anything near as good in the UK.
That is until last year, when I was able to
see close up the plaster cast buildings by Townstreet during the Warley
show. I had been unaware of these, as the business does not have a
website. I have to say that I was very impressed indeed. Most cast
buildings I see are far too crude to consider. What was even better
was that the cost was quite sensible.
I telephoned Pat Lockley who was extremely
helpful and quickly grasped what I was trying to achieve. I must say
though, it brought into sharp focus how much I do use cyberspace. The man
is actually a Luddite and does not have internet! I could not just say,
look at this on my website...and I had to wait for him to send me a
catalogue....printed on paper for Christ's sake!
Nevertheless, we went through my ideas and
developed a shopping list. There is quite a lot of room to mix these
castings around to arrive at almost custom structures. The bits quickly
arrived and I was very impressed with the standard of detail and
cleanliness of the castings. Very little work was needed to get near
perfect fit between the bits.
Some of the smaller models are cast in one
piece and are paint ready. One point is that many of the models do not
have see through windows. Here the trick in to use black paint with a
gloss varnish to represent glass. Hell, it must work as I had not noticed
this at Warley! I also have to point out that the structures are not
light. Each building weighs roughly five times more than one built in
Wills plastic sheet, for instance.
So far we have fishermens' sheds, a small
site office, three types of warehouse and a 'pretentious' main office
building for Glenthorne Harbour Authority. The latter is a real mixture of
bits of kits.
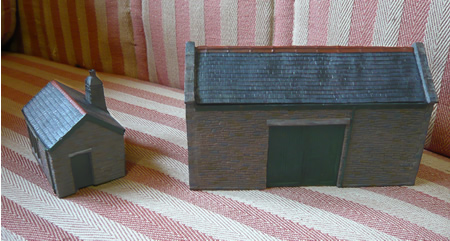
Starting with two of the more simple
buildings, (yard office and shed), the trimming to fit took me no more
than fifteen minutes and I then gave them a wash with 50% diluted brown
plastic emulsion. This is not the way Pat suggests building and painting
his models, but I will always choose the quick route that I know works for
me! Pat suggests that enamel paint is used. I gave up on enamel some time
ago and only use water based acrylic.

The site office is as it came and just with a light paint wash and the
stone shed, glued and filled. - click on image to enlarge
Once dry, the parts of the shed were glued
together with PVA woodworkers' adhesive. Sadly, 5 minute epoxy will just
not work on such a porous surface. This means there is more drying time
which I always find annoying. I used masking tape to hold the bits
together.
How robust are Pat's castings? I have to
admit to dropping one of the delicate roof sections 3ft onto a concrete
floor (could not even blame the cat). Apart from a tiny easily repaired
chip.........nothing happened............ amazing!
After about 4 hours of drying, the building
can be handled and small gaps filled with Polyfilla. The excess can easily
be removed with a dental pick. I spent one hour of time to get to the
stage shown above. If I had built this using Wills plastic sheet it would
have been three long days!
Next job was to paint the windows black. Once
dry, I dropped on a small drop or gloss varnish and worked it over the
window panes with a dental pick.
the base painting completed - time 3 hours
The roof was first painted in matt black,
making sure that all the cracks were black. The windows, gutters and doors
painted in green and then the stonework painted in the base colour. Once
dry, stones were picked out in slightly different colours, the green
paintwork weathered a little and the roof dry brushed in slate colours.
A couple of hours later, the mortar colour
was mixed and a few drops of detergent added. The paint is thinned
sufficiently
so when a drop is touched onto a vertical wall it runs like magic between
the stones. Several drops need to be added until the job is done.
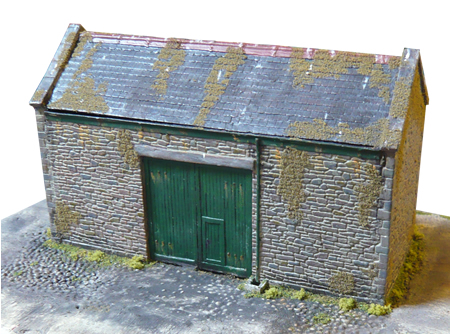
Completed
bonded store including bird poo! The gold
lichen is found throughout that area on buildings that are on the coast.
They feed on the bird poo! Note how the cobbles are more or less lost. The
effect is created by applying Polyfilla with a small stiff brush.
As is so often the case, these kits have
evolved as new items have been issued. Two other buildings were built very
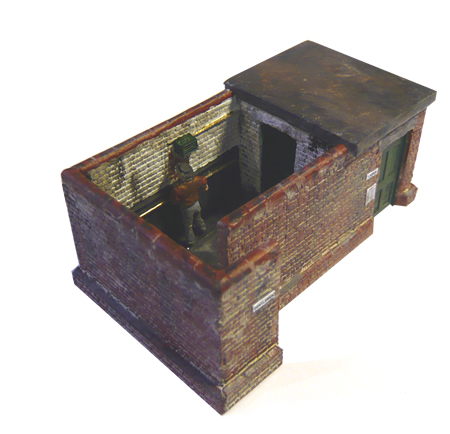
easily. The farm cart shed which has been modified to include a marine
engineer, and the cow shed, which is perfect for fishermens' sheds.
The next project was a 'mix and match' using
part of their station with a rococo portico. Here, the windows were
pierced right through. A lot of clearing was needed to get the apertures
square and there was the the considerable depth (1/4") of the apertures
which needed filling with clear glazing to bring the 'glass' to the
correct position. In my mind, this arrangement is the worst of both
worlds. I glued clear plastic across the inside of the windows and filled
the aperture with West clear epoxy. This has done the trick but not to my
entire satisfaction as with the best will in the world, the epoxy does not
make completely flat panes of glass.
The next building tacked was a large brick
warehouse. This assembled very well indeed but I became increasingly
alarmed about the weight. The harbour section has to be lifted into an
upper rack of our transport trailer. I made the decision to scrap the
plaster roof of the main building and replaced it with lightweight slate
sheets from Wills. This presented me with the next problem; how to attach
to plastic roof to plaster. The West penetrating epoxy system came to the
rescue again. This was painted onto the plaster surfaces and when cured,
it was possible to use 5 minute epoxy. The warehouse has etched brass
windows, so the realism level is excellent.
the marine engineers mostly detailed and ready for fitting
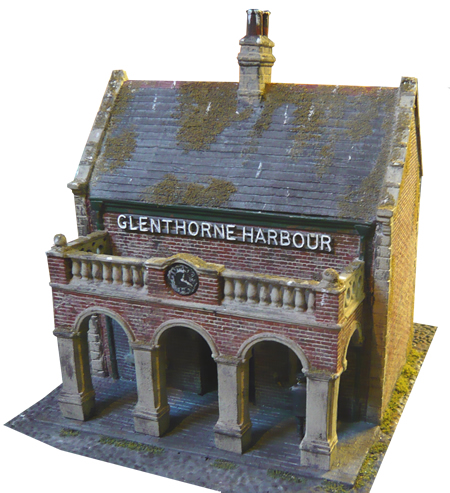
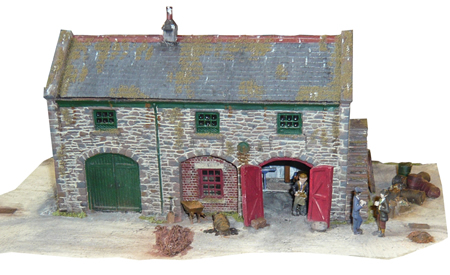
The main harbour office
And finally, scratch built in plastic - the
Glenthorne Harbour toilet. This is shown as painted, prior to the use of
weathering powder.
The last building for County Gate was
Glenthorne House which is just visible on the cliff tops behind trees in
the corner of the harbour module. This was built at 1.75mm/ft from
modified Builteze sheets supplied by Freestone Models.
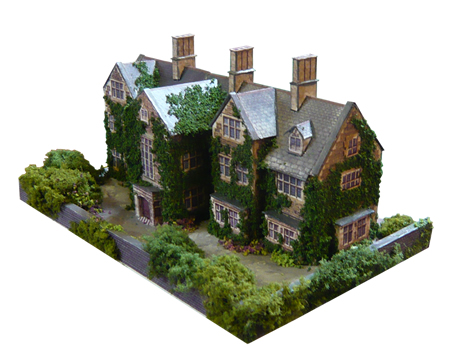
Glenthorne House - click on image to
enlarge
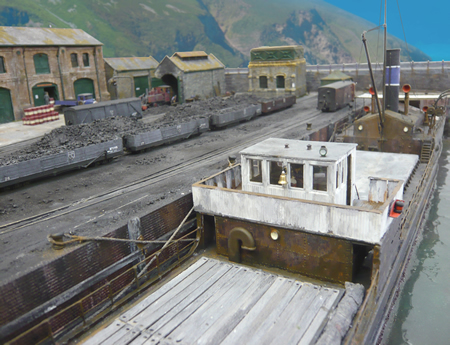
'Glenthorne Rose' is starting to offload

|