|
Glenthorne Harbour -
building the track
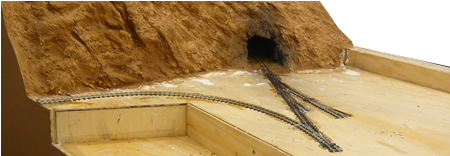
the start of track laying - click on image
to enlarge
The simple track layout is laid with Peco 009
track. The sharp curve to the left is non-operational and the point is soldered
into one position. The track is fastened with epoxy and will be set in plaster
to represent tram track.

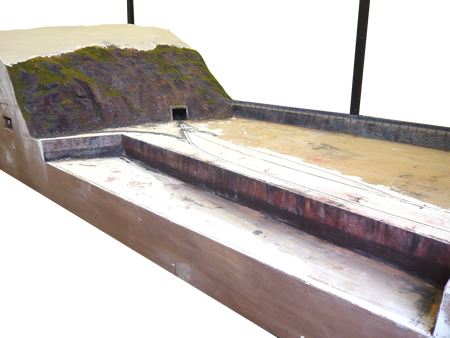
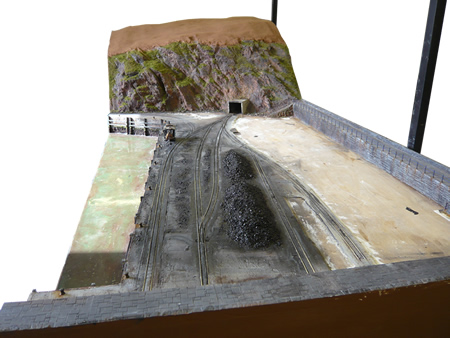
The track set in Polyfilla - click on image
to enlarge
The photo above shows the track set in plaster.
Plasticard has been used to fill between the blades. The plaster is set just
below the rail top level to allow track cleaning without removal of plaster
finish. The start of the rock shelter can be seen and steps, 'hewn out of living
rock' to the top of the mole. The concreted track depicts the 'cheap and
cheerful' method of setting in track. This was often used in sidings and low
loading situations. Conventional track would be just concreted over, with wood
left in the flangeways which was subsequently removed. I actually did this
job once on the D&RGW narrow gauge at Durango depot.
The trick in making 'Pecofilla' (Peco track set in
Polyfilla) is to work the plaster at exactly the right cure. The first job is
always to glue in the Plasticard filler between the point blades. Care must be
taken to ensure that no glue strays to the blades. Once satisfied that the point
operates correctly, electrical drop wires are soldered in where necessary and
led through small drill holes to the underside. The whole area is then covered
with wettish Polyfilla and then screaded off to rail top and harbour wall
level with a 12" steel rule.
If you get it right, you will actually get very
realistic screed marks (slight fine corrugation) which should of course be left,
if you are modelling rough concrete. Attention should be given to the direction
of screading to get the correct effect.
example of different screading directions
As soon as the plaster is laid and screaded, the
next job is to scrape out the flangeways. For this, we used a thin piece of
nickel silver offcut filed to shape. The whole affair was then allowed to
go off for three hours.
We wanted to model chipped and worn out concrete.
For this, I ran a 12" steel rule down the flangeways until it bounced along the
rail fastenings. At this stage of cure, bits of plaster were pulled away giving
a worn appearance. If you want new concrete, leave to cure for 12 hours before
doing this. The former will leave the plaster smooth and this is appropriate, as
close to the rails, the concrete would have been metal floated.
This is also the time to make sure that the points
still work. I had to spend some time with a dental pick to clear out excess
plaster until they worked. I also used the pick to remove residual plaster still
attached to the rails and cleared out the flangeways of the checkrails and
frogs.
A final detailing is done at least 12 hours after
laying the plaster.
Most of the trackwork down.
There remain 2 sidings to complete. - click on image to enlarge
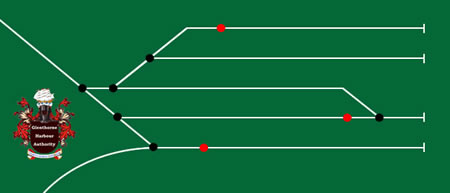
the harbour control panel
The track was then painted with the surrounding
'concrete' and treated with weathering powders. The track is then carefully
cleaned. It is so important that the rail head protrudes above the surrounding
concrete as otherwise a track rubber will remove the paint coatings. Check for
this with a track rubber and where necessary scrape the plaster down and recoat.
Once happy that the track still works, test it with a bogie which has the
deepest flanges you will use. Run it down the track with your finger. You will
feel any excess plaster that still needs digging out.
the completed track ready for wiring - click on
image to enlarge
I then fitted Tortoise motors, as usual, using a
thicker actuating rod than than supplied. I do not recommend using Peco motors
for this application as they depend upon a tiny spring to hold the blades into
position. After all this abuse, the blades may not be quite so free as they
would be normally and need a firm system to keep them in the correct position.
The Tortoise motors have two internal switches, one
of which can be used to change the polarity of the frogs/blades. Three Peco
electromagnetic uncouplers were added and a number of my County Gate 'Wobblers'
(see here)
which really do get a stuck train to work. The harbour section is not part
of the DCC automation so wiring here in conventional DCC.

|